Boating in Southwest Florida’s beautiful waterways is a rewarding experience, but it’s important to be mindful of our environmental impact. Below are some tips that can help you practice sustainable boating and protect this precious natural resource.
We think boating is certainly the best way to spend time on the water, but we also care about the environment just as much as we do a fun day of boating. When boaters make poor decisions or don’t take the proper preventative measures, many unintentional and unexpected consequences can affect our famous Southwest Florida environment.
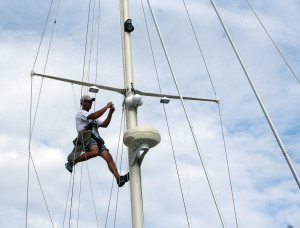
Standing rigging are the most important parts that keep your mast on your boat. When the mast goes overboard, not only can it be dangerous, but it can also be very expensive. You probably lose your sails, the electronics on your mast (wind, radar, antennas etc.) and your boat will be less stable.
The best way to check your rigging is have a qualified rigger go aloft and check the rigging from mast head to the chainplates.
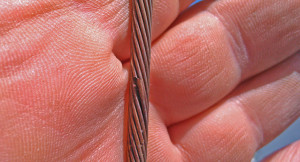
When should you check the boat’s rigging? Most experts agree that your rigging needs to be checked after 10 years. Many insurance companies require that rigging needs to be less than 10 years old before they will insure your boat. If the rigging is closer to 15 to 20 years, you are asking for trouble. The rigger should use a blue ink dye that is used to confirm cracks in stainless steel swage fittings and the wire. Sometimes you see a line that looks like a crack, but by wiping it with the dye and sanding it with a medium duty cleaning pad (Scotch Brite), you can determine if it is an actual crack or just a line caused by swaging. The entire length of the wire needs to be checked. You can have two or more strands of wires cracked at different locations of the same wire (see slide show).
While aloft, the rigger should be checking the masthead, the sheaves, any sign for cracks in welds such as the mast head, spreader joints and all pins and rigging connections. We recently inspected the top of a furling system that was not performing correctly; the culprit was the cracked head of the system and the frozen bearings.
Rigging is not as expensive as you might think. If only a few stays are effected it can be changed without taking the mast down. If all the rigging needs to be replaced, than the best thing to do is unstep the mast and take that opportunity to change out the electric wires; good chance is they don’t meet current ABYC standards, and check the steaming and anchor lights. Whatever you do, don’t take too long to have a rigging expert take a good look at your rigging!
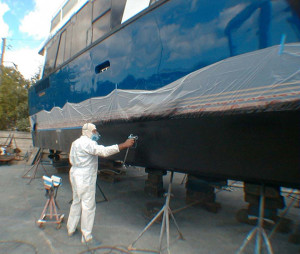
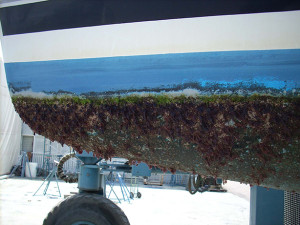
Having antifouling paint applied to a boat bottom is the most common part of maintenance on a boat that stays in the water. A clean bottom is fuel efficient and at today’s fuel price it is something you should be concerned about. If you are a sailor and race your boat, it is equally important so you can stay competitive on the race course and if cruising, you will just cruise faster.
Why do bottom job prices vary so much from boat yard to boat yard? The labor cost is close to being the same (within 5%) and the cost of material should be the same for all yards. So what is the difference?
Many yards quote on a bottom job using a base number which includes haulout, pressure cleaning and minimal prep for painting. Then, when the boat gets to the yard, the price changes because it had barnacles and that will be an extra charge. Then there will be another charge because it takes more than a couple of hours of prep. Want the entire bottom sanded? That is another charge. Will they paint just one coat on the boat and charge you extra for more paint?
The Sailor Wharf quotes ONE price and we have been doing it way since 1978. The only time we charge extra for bottom prep is when the barnacles are so large that you may even have oysters on your bottom. If your bottom paint is flaking off, the hull which happens when the original paint was not properly applied or, more common, when the original paint is so old that it no longer has the adhesion to stick to the hull, we would recommend the total removal of the paint.
The proper way to prep a bottom and the only way the Sailor’s Wharf will do the job:
The boat gets hauled, pressure cleaned and the boat gets blocked.
The next step is to sandblast the shaft(s), propeller(s) trim tabs, thru hull fittings, rudder(s) and other metal underwater gear. We then inspect shaft bearing(s) the propeller(s) and rudder(s) for any wear, corrosion, electrolysis and any other issues that can only be seen when a boat is out of the water.
To properly prep the boat’s bottom, we use vacuum sanders. It is not only the right way of doing it environmentally, it is also more efficient, since the dust is immediately removed and the sandpaper can do its job properly. The worker can also see exactly where he is going, since there will be a clean surface while he is sanding. The next step is to wash all the dust off the bottom and the prop(s) and running gear gets painted with quality metal paint for that purpose. The rest of the bottom gets painted with your choice of anti fouling paint which, we either roll or spray on, with an airless paint sprayer depending on the customer’s choice. We move the boat stands so we can have the entire boat painted except for the keel blocks. When the paint is dry (usually 24 hours) we lift the boat and paint the keel block areas and inspect the bottom one last time. When the final paint touchup is dry, we launch the boat and wash the deck.
Most of our customers ask if there is a new bottom paint they should use on their boat? The honest answer is maybe. I always tell our customers if the paint they are using is working than don’t switch unless you have a reason. So here are some reasons that you may want to switch:
All paints have a type of resin binder that keeps the paint compound together. After years of paint buildup, the first coat that was put on 10 years ago has reached the end of its life; the resin is brittle and can no longer adhere to the hull. No one can guarantee that any paint will adhere without flacking off. You can delay removing all the paint but you will need to fair the old paint and hope that it will hold until the next haulout. I have seen paint flacking off as you apply the new paint because the solvent in the new paint will soften the old, tired paint. The only way to cure the problem is remove all the old paint to the bare hull.
Ablative paint eliminates paint buildup since every time your diver cleans the bottom of the hull they are cleaning some of the ablative paint off the hull and exposing new paint. This paint usually cost a little more but is well worth the cost. Some people have success using a hard paint for their first coat, usually a different color, they then apply a couple of coats of ablative paint so the diver can warn the owner when they are down to hard paint and will need to get the boat hauled for a bottom job.
Last year I won the Regata del Sol al Sol, the St Petersburg to Mexico Race in the mono hull fleet. I used SeaHawk Biocop TF, a premium hard ablative paint. We also sanded the bottom with 400 grit autonet discs using a vacuum sander to get a very fast bottom in light air. I have the bottom repainted every 2 years so that I can inspect the hull, the strut & shaft, repack the grease in my 3 bladed feathering Max Prop and look for any signs of electrolysis.
There are a few new paints out there; we have applied Eco-Clad on 8 boats and the owners are happy but it is still too new to make good judgment on the results. SeaHawk has their new Smart Solution paint. If you really want to become an expert, take a look at the web sites of the common paints used on the Florida West Coast, www.pettitpaint.com, www.seahawkpaints.com, and the new www.ecoclad.com.
After you have done all the research, ask owners of the boats around you to find out what works best in your immediate area. Whatever you do, don’t wait too long between painting your boat’s bottom. Paint companies only warrant paint for 1 year and you can typically get 18 months to 2 years out of a good bottom job. When you start pushing this time line, you are asking for trouble. You need to inspect the bottom of your boat for signs of electrolysis, wear on the shaft cutlass bearings, rudder, blisters etc. I have found that in the 35 years of owning our boat yard, the customers who have a regular maintainance schedule of 18 months to 2 years will come out ahead financially over the long term.
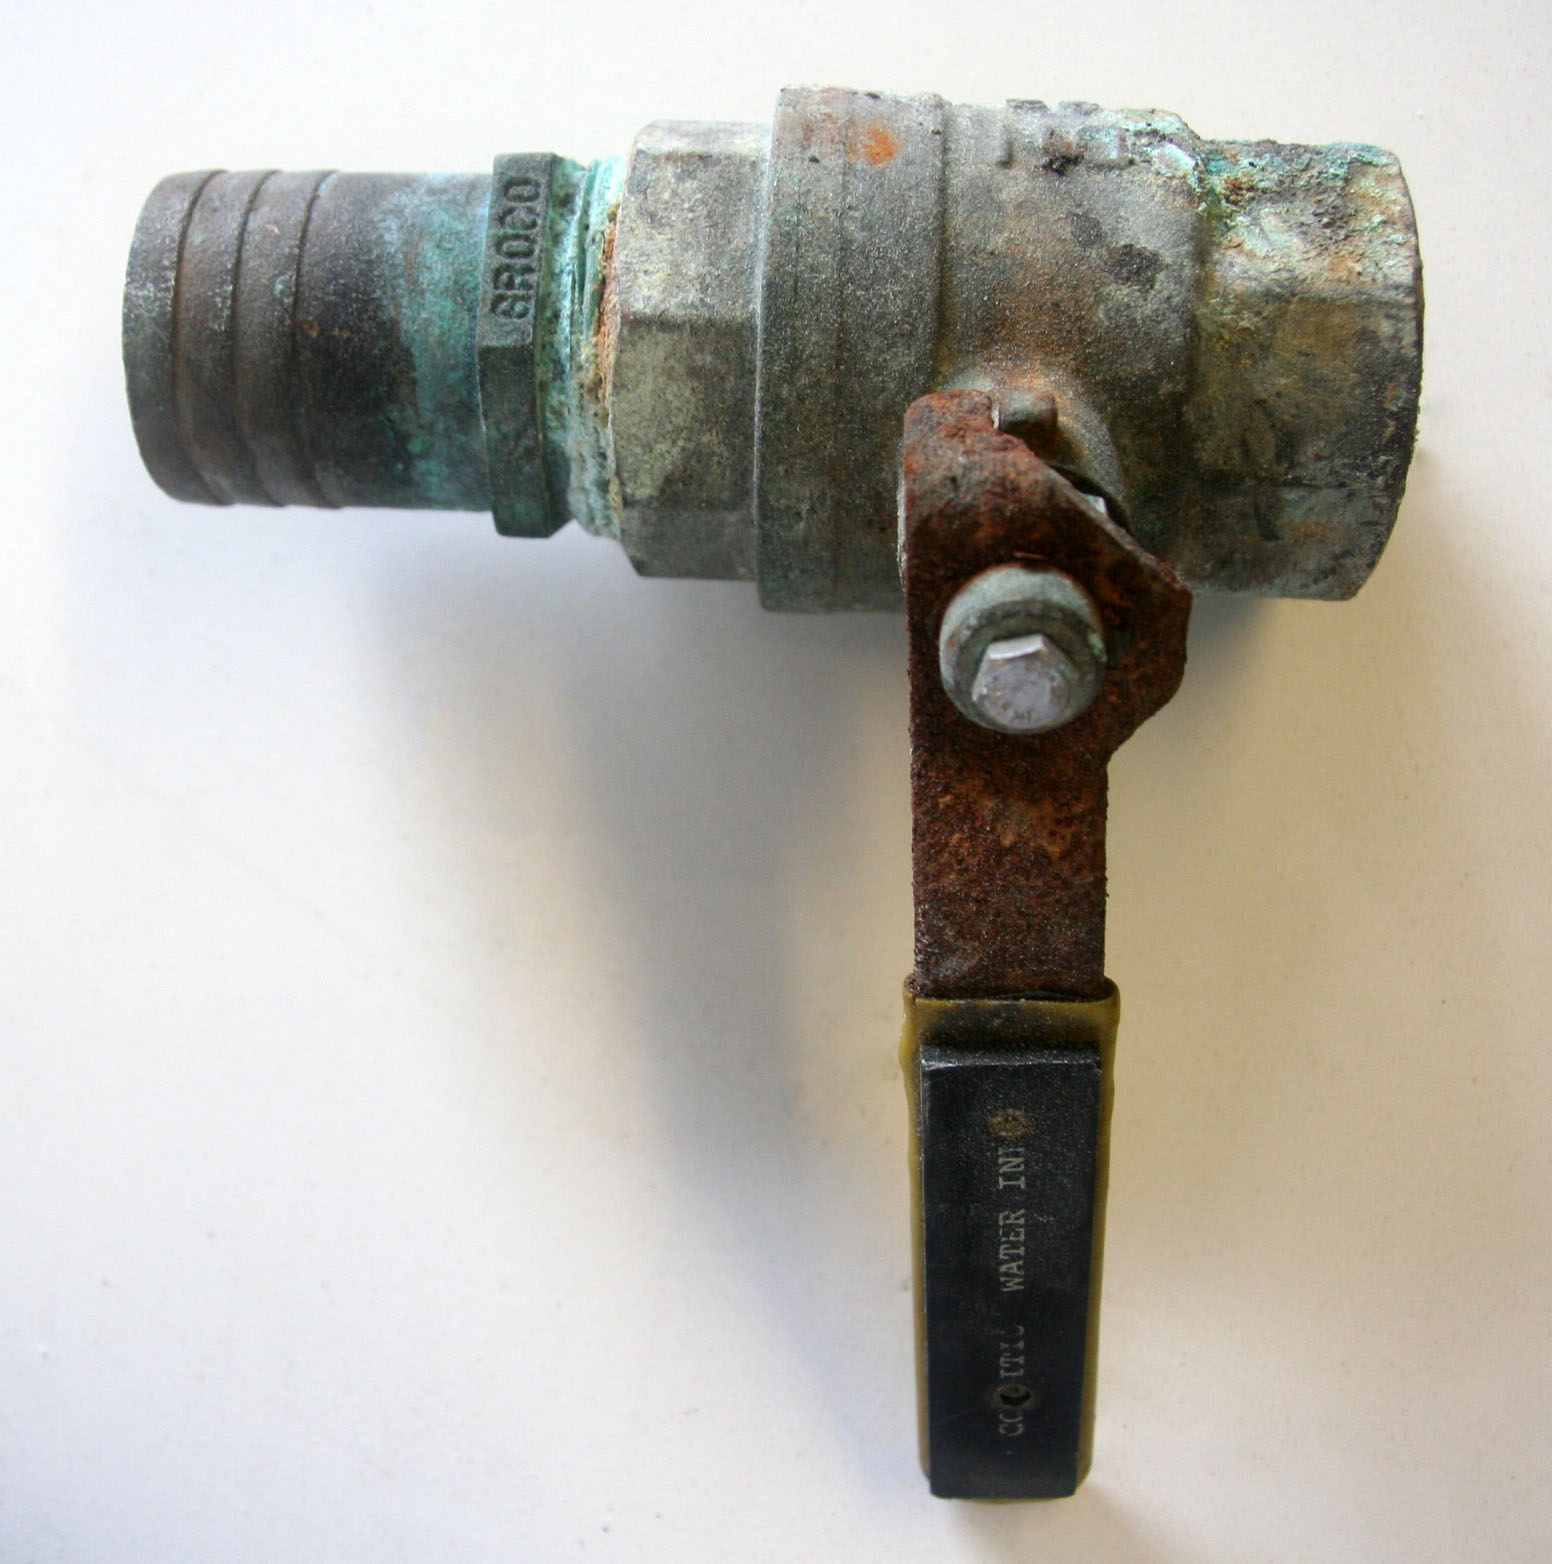
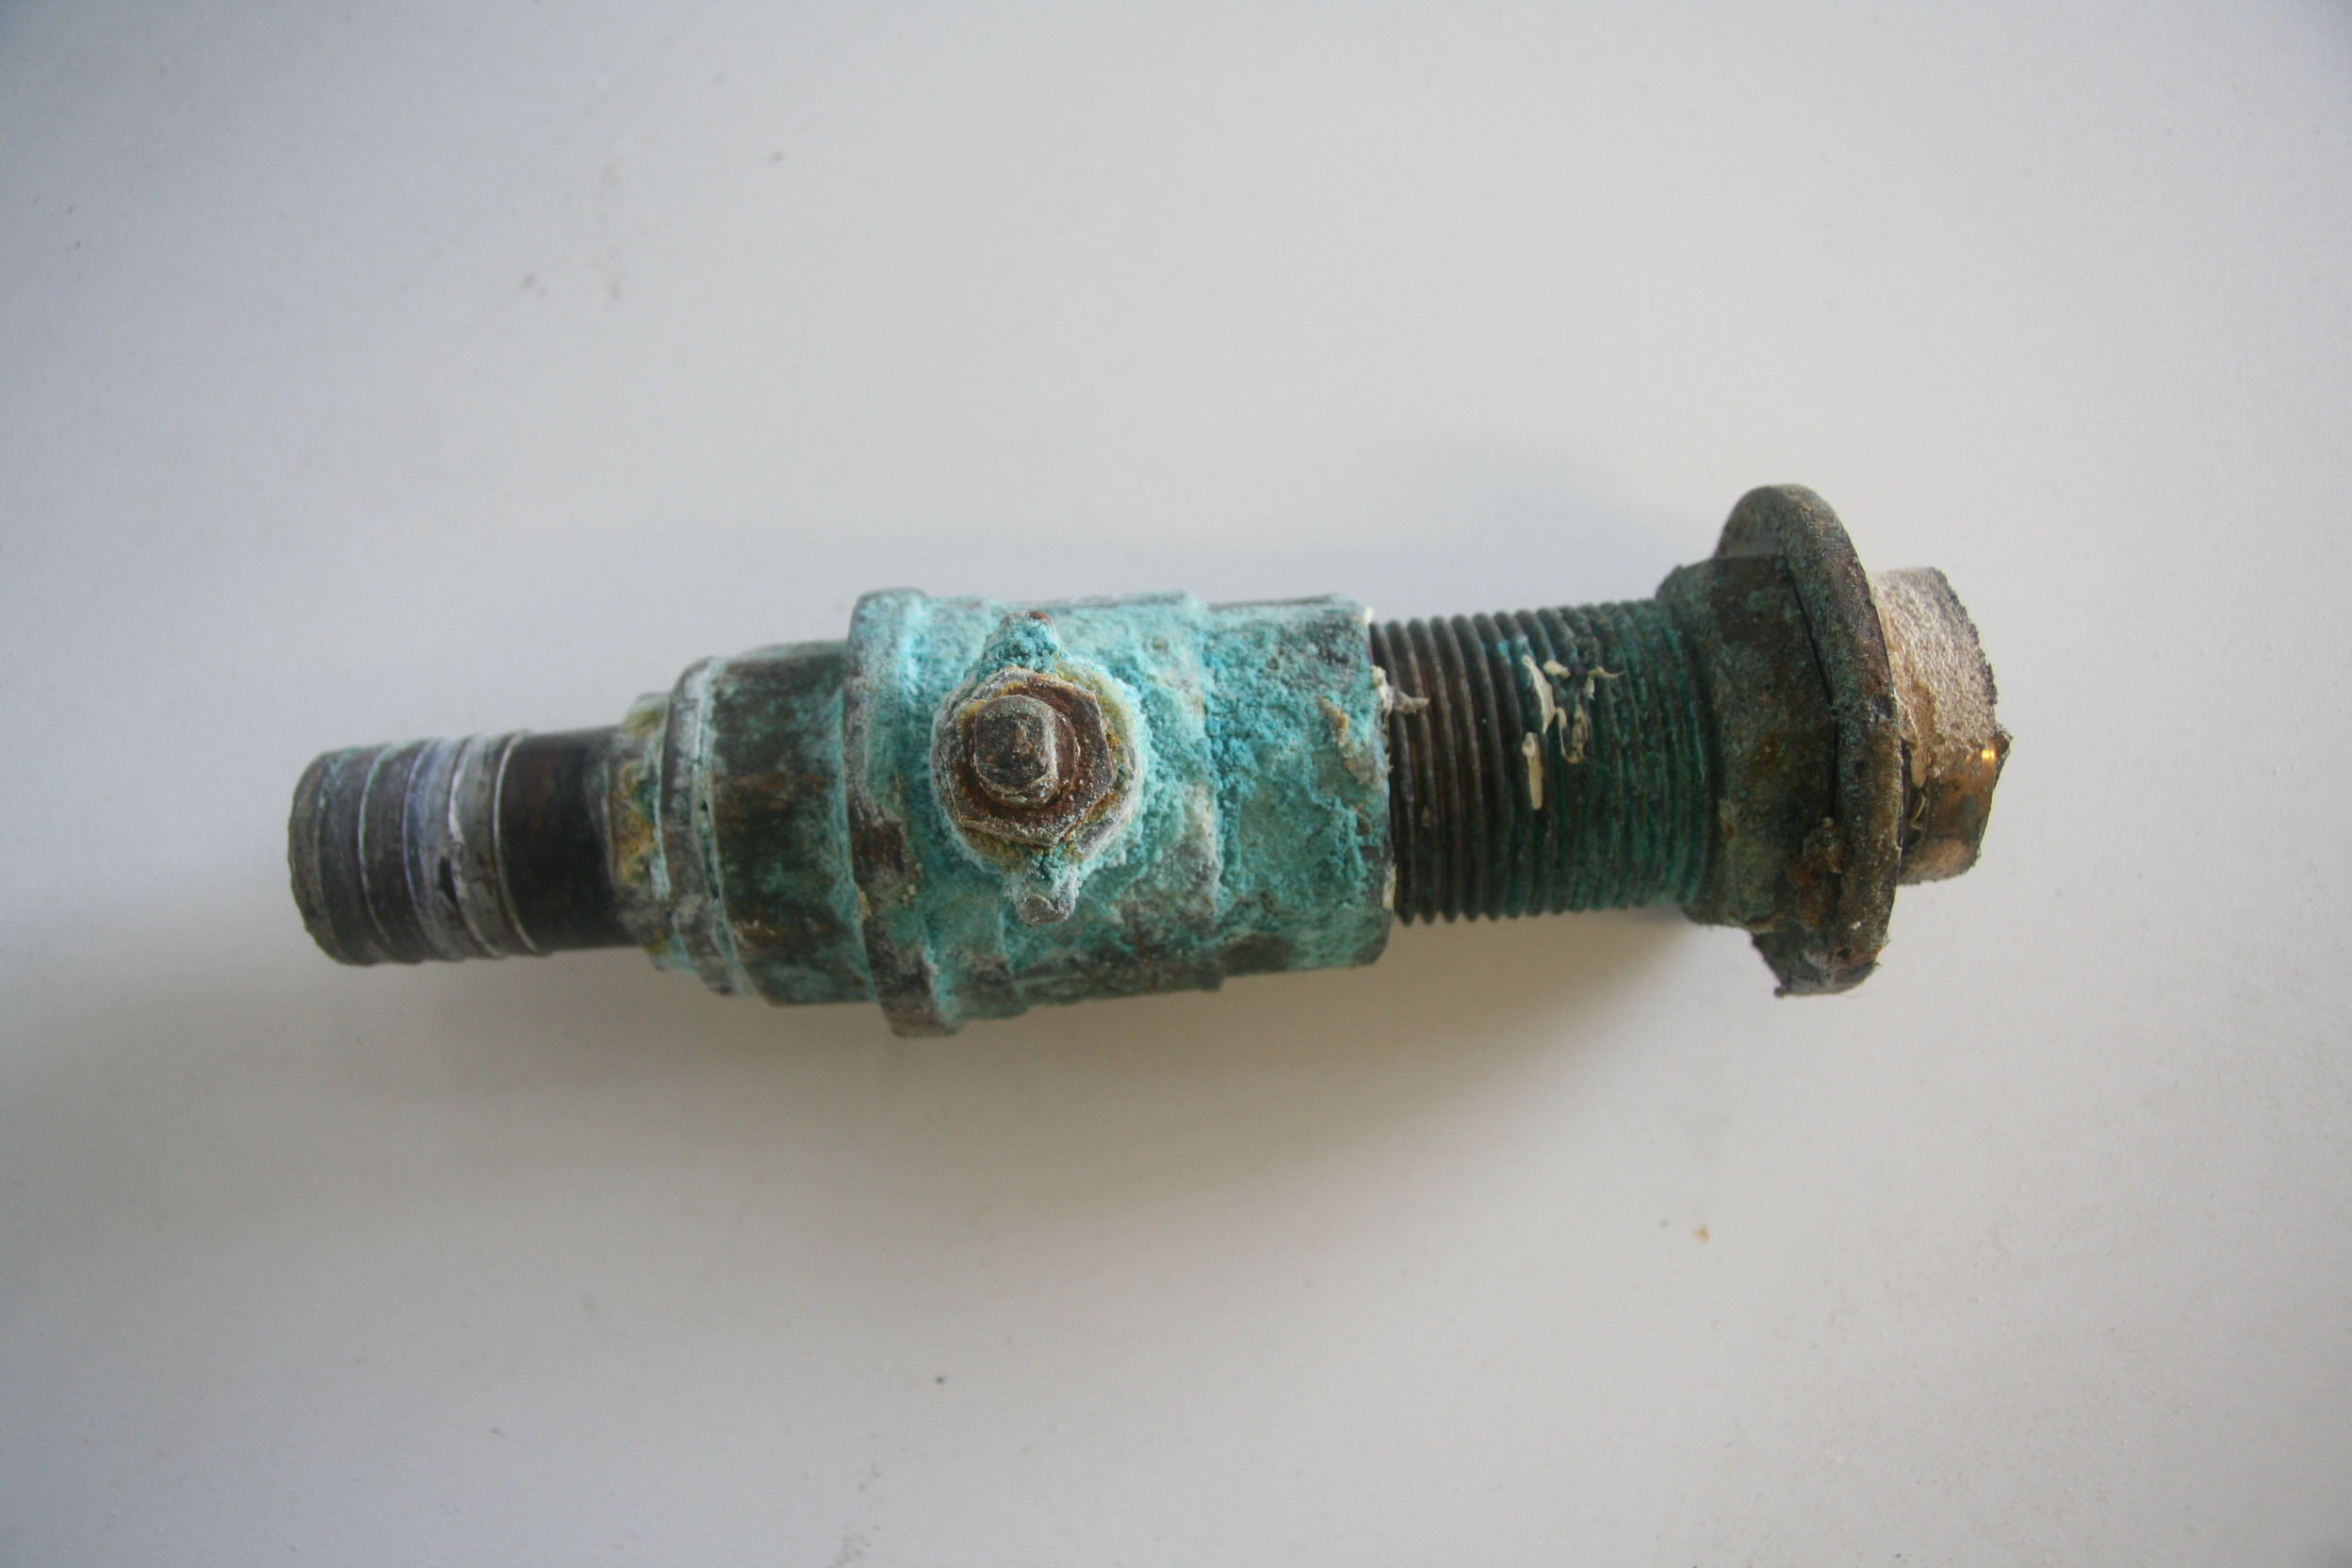
A few years ago there was a recall on cetain thru hull fittings. We were ready to haul the boat that needed to have all the thru hull fittings replaced and the skipper suggested that the thru hull fittings did not really look bad. I tried to open the macerator thru hull fitting, knowing that it was the one that was least used. The thru hull broke and I had a ball valve in my hand. I yelled to our hoist operator that it was time to haul the boat. I was able to hold a rag over the 1” opening until the boat was hauled. Needless to say, there was no dispute that they all had to be replaced.
I remember in the 70’s and 80’s we had many boats that had gate valves. ABYC outlawed them, since the handles and more important the stems of the handles had a tendency to break. As we all know, these events happen in the worst circumstances. I very seldom come across a gate valve, and when I do, the skipper knows that it is one safety issue that needs to be resolved.
It is very important to maintain your ball valves and it is very wise to open and close your thru hulls periodically to make sure they open and close as they should. You should also lubricate them, which is best done when the boat is out of the water. You can check the thru hulls first when scraping the paint from the metal and if it looks golden and not pink, it is in good shape. If the metal is pink, the thru hull fitting should be replaced immediately, since the metal has no strength and is ready to fail.
One easy way to do this is to spray a PTFE type lubricant up into the thru hull when the ball valve is open and also spray the handle area the day before (this can be done in the water). It is important to open and close the ball valves a few times to make sure they work smoothly. You should be able to open and close your thru hull valves with your hands without using tools.
When you do have to change out the thru hulls of your boat, you should also consider changing out the hoses attached to the valves. In many cases the hose will break when you try to remove it from the valve fittings, which is a signal that the hose is deteriorated to the point that it can become a major safety issue.
When you have work done on the bottom of your boat at the Sailor’s Wharf, we will bring these type of issues to you attention; if you go to another yard, request that they, or you, take a good look at what is under the hull…. it may save your boat!
 The best way to check your rigging is have a qualified rigger go aloft and check the rigging from mast head to the chainplates.
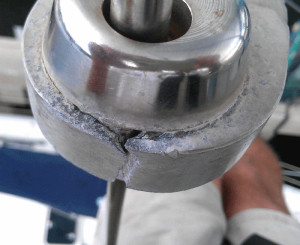
 Why do bottom job prices vary so much from boat yard to boat yard? The labor cost is close to being the same (within 5%) and the cost of material should be the same for all yards. So what is the difference?
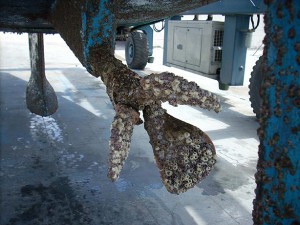 The Sailor Wharf quotes ONE price and we have been doing it way since 1978. The only time we charge extra for bottom prep is when the barnacles are so large that you may even have oysters on your bottom. If your bottom paint is flaking off, the hull which happens when the original paint was not properly applied or, more common, when the original paint is so old that it no longer has the adhesion to stick to the hull, we would recommend the total removal of the paint.
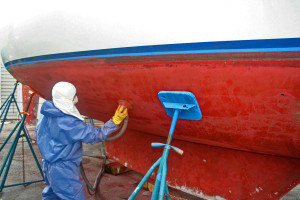 To properly prep the boat’s bottom, we use vacuum sanders. It is not only the right way of doing it environmentally, it is also more efficient, since the dust is immediately removed and the sandpaper can do its job properly. The worker can also see exactly where he is going, since there will be a clean surface while he is sanding. The next step is to wash all the dust off the bottom and the prop(s) and running gear gets painted with quality metal paint for that purpose. The rest of the bottom gets painted with your choice of anti fouling paint which, we either roll or spray on, with an airless paint sprayer depending on the customer’s choice. We move the boat stands so we can have the entire boat painted except for the keel blocks. When the paint is dry (usually 24 hours) we lift the boat and paint the keel block areas and inspect the bottom one last time. When the final paint touchup is dry, we launch the boat and wash the deck.