Have you checked your rigging lately?

Standing rigging are the most important parts that keep your mast on your boat. When the mast goes overboard, not only can it be dangerous, but it can also be very expensive. You probably lose your sails, the electronics on your mast (wind, radar, antennas etc.) and your boat will be less stable.

Steve-Taking-Picture-of-Rigging-21
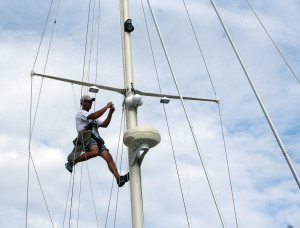
The best way to check your rigging is have a qualified rigger go aloft and check the rigging from mast head to the chainplates.

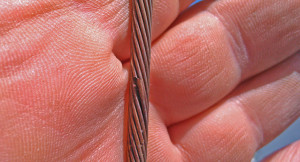
When should you check the boat’s rigging? Most experts agree that your rigging needs to be checked after 10 years. Many insurance companies require that rigging needs to be less than 10 years old before they will insure your boat. If the rigging is closer to 15 to 20 years, you are asking for trouble. The rigger should use a blue ink dye that is used to confirm cracks in stainless steel swage fittings and the wire. Sometimes you see a line that looks like a crack, but by wiping it with the dye and sanding it with a medium duty cleaning pad (Scotch Brite), you can determine if it is an actual crack or just a line caused by swaging. The entire length of the wire needs to be checked. You can have two or more strands of wires cracked at different locations of the same wire (see slide show).

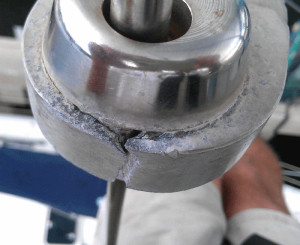
While aloft, the rigger should be checking the masthead, the sheaves, any sign for cracks in welds such as the mast head, spreader joints and all pins and rigging connections. We recently inspected the top of a furling system that was not performing correctly; the culprit was the cracked head of the system and the frozen bearings.

Cracked-Spreader-End-WEBCracked-Strand-on-Mast-Stay1


Rigging is not as expensive as you might think. If only a few stays are effected it can be changed without taking the mast down. If all the rigging needs to be replaced, than the best thing to do is unstep the mast and take that opportunity to change out the electric wires; good chance is they don’t meet current ABYC standards, and check the steaming and anchor lights. Whatever you do, don’t take too long to have a rigging expert take a good look at your rigging!

Written by: J. Jopie Helsen, www.sailorswharf.com, [email protected]

Which bottom paint should I use?

Most of our customers ask if there is a new bottom paint they should use on their boat? The honest answer is maybe. I always tell our customers if the paint they are using is working than don’t switch unless you have a reason. So here are some reasons that you may want to switch:

All paints have a type of resin binder that keeps the paint compound together. After years of paint buildup, the first coat that was put on 10 years ago has reached the end of its life; the resin is brittle and can no longer adhere to the hull. No one can guarantee that any paint will adhere without flacking off. You can delay removing all the paint but you will need to fair the old paint and hope that it will hold until the next haulout. I have seen paint flacking off as you apply the new paint because the solvent in the new paint will soften the old, tired paint. The only way to cure the problem is remove all the old paint to the bare hull.

De-Fever-48-Painted-edit

Ablative paint eliminates paint buildup since every time your diver cleans the bottom of the hull they are cleaning some of the ablative paint off the hull and exposing new paint. This paint usually cost a little more but is well worth the cost. Some people have success using a hard paint for their first coat, usually a different color, they then apply a couple of coats of ablative paint so the diver can warn the owner when they are down to hard paint and will need to get the boat hauled for a bottom job.

Last year I won the Regata del Sol al Sol, the St Petersburg to Mexico Race in the mono hull fleet. I used SeaHawk Biocop TF, a premium hard ablative paint. We also sanded the bottom with 400 grit autonet discs using a vacuum sander to get a very fast bottom in light air. I have the bottom repainted every 2 years so that I can inspect the hull, the strut & shaft, repack the grease in my 3 bladed feathering Max Prop and look for any signs of electrolysis.

There are a few new paints out there; we have applied Eco-Clad on 8 boats and the owners are happy but it is still too new to make good judgment on the results. SeaHawk has their new Smart Solution paint. If you really want to become an expert, take a look at the web sites of the common paints used on the Florida West Coast, www.pettitpaint.com, www.seahawkpaints.com, and the new www.ecoclad.com.

After you have done all the research, ask owners of the boats around you to find out what works best in your immediate area. Whatever you do, don’t wait too long between painting your boat’s bottom. Paint companies only warrant paint for 1 year and you can typically get 18 months to 2 years out of a good bottom job. When you start pushing this time line, you are asking for trouble. You need to inspect the bottom of your boat for signs of electrolysis, wear on the shaft cutlass bearings, rudder, blisters etc. I have found that in the 35 years of owning our boat yard, the customers who have a regular maintainance schedule of 18 months to 2 years will come out ahead financially over the long term.

Written by: J. Jopie Helsen, www.sailorswharf.com, [email protected]